Learning to ROEST with Long Miles Coffee Part 2
Profile Development
This is a part 2 of the blog Learning to roest by David Stallings from Long Miles Coffee. Read the first part here.

David roasting samples on his ROEST sample roaster.
Over to David:
Though Long Miles is on the cusp of our expansion into Kenya and Uganda, my learning how to use the Roest coincided with the Burundi harvest. As such, I had to find profiles that worked well to highlight the flavors of a Fully Washed Burundi coffee, a Natural Burundi coffee, and a Honey Processed Burundi coffee. I was glad to have this built in limiting the number of coffee types I was looking to dial in. That said, I do not think it changed my process greatly and I believe that after my time dialing in Burundi coffees, I am confident roasting coffee from any origin on the Roest.
understanding the BEAN TEMPERATURE BEHAVIOUR
The profiles I started with were all based on Air Temperature. I noticed immediately that my bean temperature dropped off fairly quickly after first crack compared to profiles I found in the various resources Roest offers to its users.

Though this says Batch #46, this was actually one of my first roasts on the Roest (my machine had been used as a demonstration model prior to my owning it).
One of the first things many of us were taught as roasters is to not let the bean probe temperature drop after first crack (or at any point in the roast, for that matter). Over the past six years, in particular, attempting to achieve light to very light roasts that are still fully developed and soluble enough for a home consumer to make on mediocre equipment, I have learned to question this maxim slightly. I have found this to be especially true for small roasting systems (~5kg and under), though I certainly am not limiting it to small systems. I am convinced that many of the machines I have roasted on in the past decade have had bean probes that, whether owing to probe type, placement, age, or a likely combination of all of the above, are only expressing a partial truth. When development times are short (30 seconds to a minute), and if you are roasting on a machine in which you have audible confirmation of first crack (i.e. not a Loring), I would argue that hearing a continued first crack and seeing an increase in the exhaust or ambient temperature probe(s) is confirmation enough that the bean mass is moving through first crack appropriately. Based on this information I was not hugely put off by these initial roasts.
After repeating this roast a number of times, I confirmed that first crack was slightly anemic - it was a bit more of a trickle than a constant, rolling crack. This was further confirmed in the cup which was slightly starchy and underdeveloped - though, not massively so! This gave me confidence that I did not need to see a bean probe reading that continued to increase in temperature from first crack through the end for it to be properly developed. Looking at the profile I did want to see the initial rate of rise get up higher and descend more or less gradually and evenly from there. It has been my experience that getting energy into the coffee mass early in the roast is paramount for a fully developed light roast.
profile adjustments
I made some quite simple (and easy to perform) adjustments to the desired Air Temperature profile. The resulting profile performed nearly exactly how I expected it to:
Minor adjustment: the Air Temperature dropped from 425°F to 350°F.
I now had a much more dramatic peak to my Rate of Rise curve. This was achieved by dropping the Air Temperature profile to only 350°F at the start, as opposed to 425°F. This minor change had profound effects for the entire roast. Not only did it get more energy into my bean mass early on, but it also allowed for a more gradual increase in my Air Temperature profile and a shorter roast time overall. This adjustment allowed the bean mass to take on heat more evenly (as indicated by the more gradual decrease in the Rate of Rise curve). I have found that energy put into the system early in a roast will carry through the entire roast if energy in is properly managed. As such, even though the target Air Temperature profile was more gentle after first crack, the bean mass continued to have more energy through the end of the roast.
Read more about all the adjustment you can make when roasting coffee on ROEST sample roaster.
understanding the Power curve
One final thing worth noting is the Power curve of the profile. When designing profiles based on Air Temperature, the ROEST sample roaster automatically modulates the burner power to hit the target Air Temperature curve. In the first roast the Power line of the graph gradually increases throughout the roast. That is the say, the system needed more energy input throughout the roast (including from first crack to the end) to achieve the desired Air Temperature profile. In the second roast, however, the Power gradually decreases. It is my experience and opinion that power (whether electric or gas), generally speaking, should decrease, not increase, over the course of a properly designed roast profile. As such, this was further confirmation for me that my profile was moving in the correct direction.
The result was a much more consistent audible first crack over the course of the 45 second development time. Further, the cup was fully developed with a noticeable increase in sweetness and clarity of flavor.
IS IT IMPORTANT TO FOLLOW TARGETED PROFILE?
Roughly seven years ago I noticed that, when using data logging software, if I tried to follow a roast profile exactly, the results were only positive if and when burner/power adjustments were in line with the profile I was trying to replicate. For example, if a roast bottomed significantly lower than the target profile (due to something like the green coffee being colder than when the profile was marked as the reference roast), and I responded by increasing the burner/power significantly in order to get the roast curve “back on target” and then dramatically decreased the burner/power as it approached the target profile, the resulting cup was significantly different than the desired goal. If, on the other hand, I kept my burner/power adjustments consistent and ignored the profile, I would have much more consistent results. As such, a roast that bottomed 20°F lower than the reference roast may have a total roast time that was 30 seconds longer. But, assuming I kept development times consistent, the resulting cup was significantly more consistent than if I had tried to slam more heat into the bean mass in order to make the profiles “look the same.”

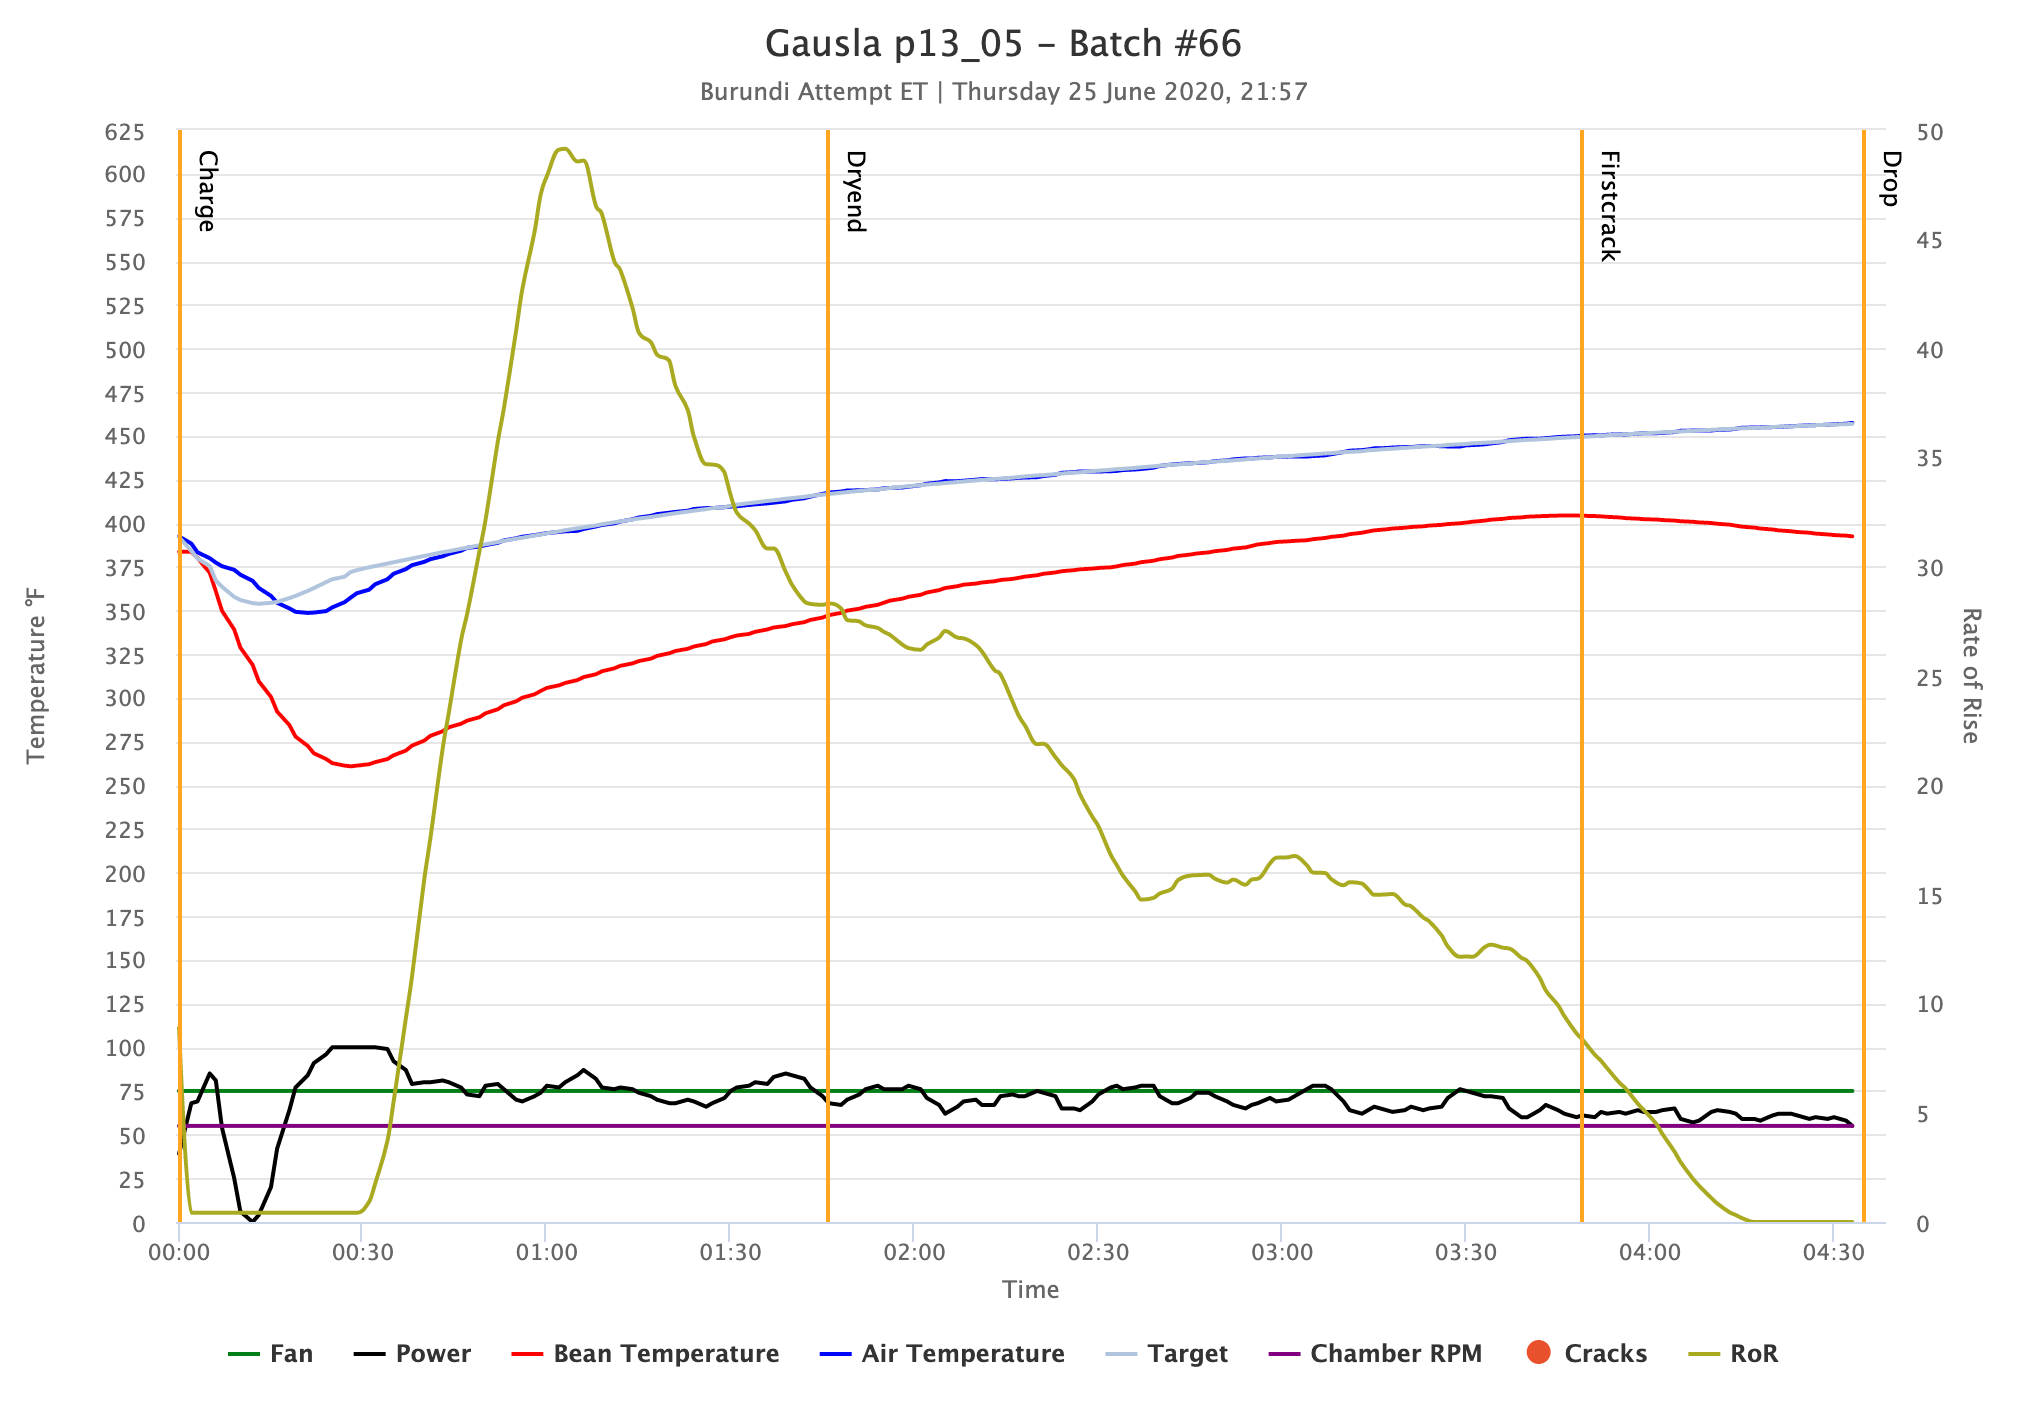
You can see the burner modulates to keep the Air Temperature consistent with the target
Similarly, looking at the second profile Batch #66, you can see that the burner modulates to keep the Air Temperature consistent with the target. It achieves its goal - impressively so. That said, I cannot help but believe that all the modulation does not necessarily have the most beneficial impact on the coffee’s development.
DESIGNING THE POWER PROFILE
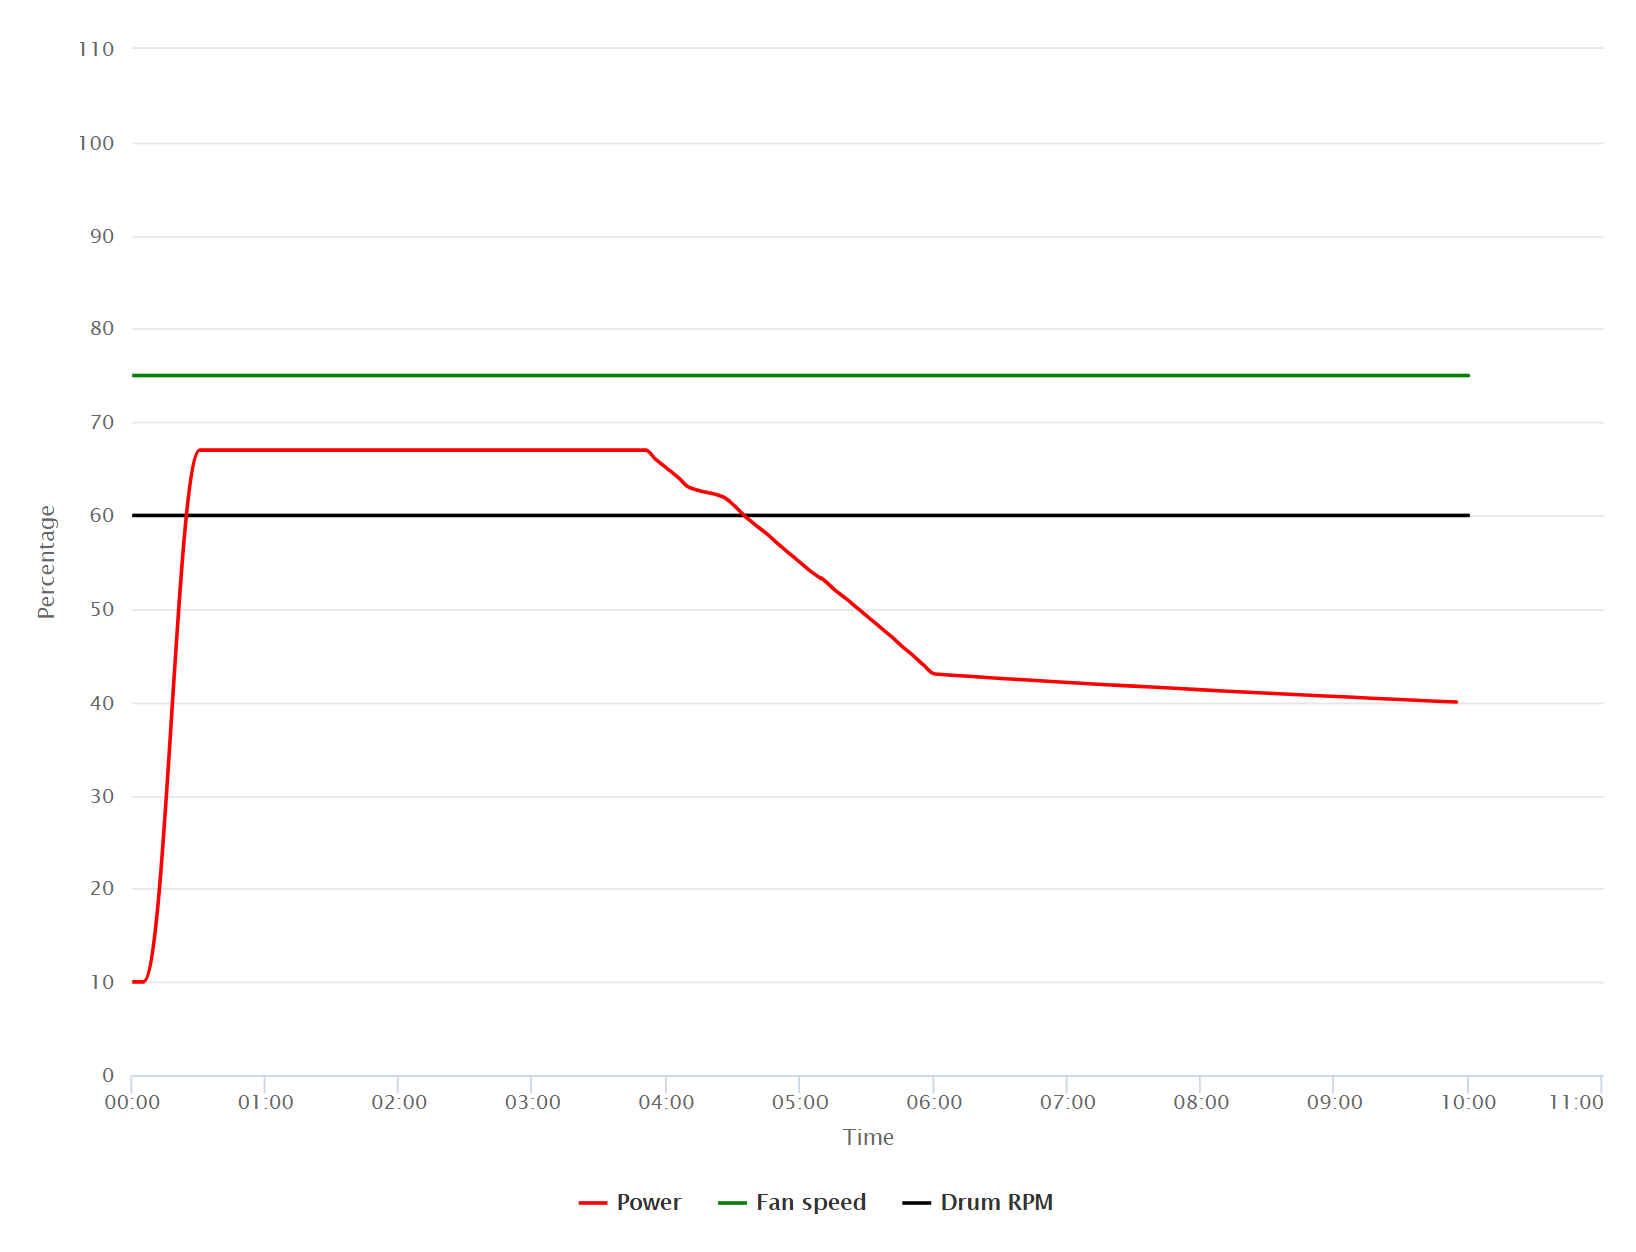
As I referenced above, I have found that consistent gas application, that descends throughout the roast, leads to the most evenly and fully developed light roasts that I have tasted. As such, I looked at the average power that the machine calculated to execute the Air Temperature profile. I then reduced it slightly as my cups were indicating that the roast might be a bit too fast. From there I designed a power profile that descended consistently leading up to first crack and through the end. I am very happy with the results:

Power profile developed for Burundi samples from Long Miles Coffee.
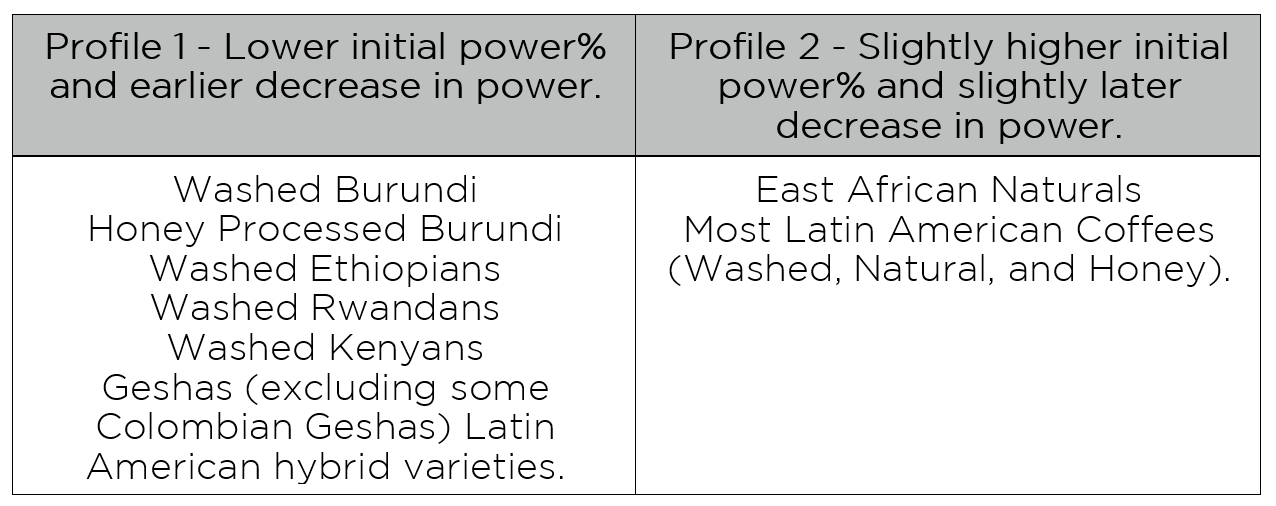
While I am by no stretch of the imagination done exploring developing profiles on the ROEST sample roaster, I have been using two iterations of the same approach to roast all my coffees lately. The only difference between the two profiles is that one ramps up to a very slightly higher power % and does not start backing off until slightly later. I have found that, for sample roasting purposes, most coffees can be divided into one of two categories:
DEVELOPMENT TIME
For my role and purposes, I typically develop each coffee for 0:40-0:50 depending on the coffee. Of course, all of this is painting with broad strokes, but sometimes that is exactly what you need to do in a lab/sample roasting situation. I am not suggesting production roasters take the exact same approach (though, I do believe there is a lot of crossover from this to production roasting).
SHARING PROFILES
It goes without saying that the ability to share profiles is absolutely wonderful. As someone representing a producer and as someone who has, in the past, worked with an importer, the satisfaction that comes from knowing that a client is tasting any given coffee as closely as possible to the way you are tasting that same coffee is absolutely huge. That said, I do think it is critical to remember that a shared profile is a starting place. Every machine is unique, every probe is unique, every environment is unique. Before assuming a profile that you receive is “bad” (especially if it comes from a trusted source), be sure to grasp the approach the creator of the profile was using and adapt it (likely very slightly) for your specific machine.