

S100 Plus or L100 Plus - Finding the right Sample Roaster for you
So you’ve been eyeing the ROEST Sample Roasters for a while and find yourself wondering - should I get S100 Plus or L100 Plus? In this article, we’ll be breaking down information about both roasters and help you make a decision.
So you’ve been eyeing the ROEST Sample Roasters for a while and wondered - should I get S100 Plus or L100 Plus?
Deciding on which sample roaster to purchase can definitely be a confusing task. The models have their own distinctive designs and include both similar and different features. To choose the right one, you must ask yourself what’s more important.
In this article, we’ll break down information about both roasters and help you decide. And should you have any questions, feel free to contact us or read more about ROEST here.

Similarities
We must first look at the similarities to find the right sample roaster for you.
All ROEST Sample Roasters is a combination of two technologies: hot air roasters and conventional open drums - offering the best of both worlds! They have a batch capacity of 50 - 200 grams*, allowing you to experiment with smaller samples and produce less waste. The dual fan system for separate cooling allows you to roast back-to-back with no daily limit. Hence, both sample roasters contribute to a better workflow.
Sounds good so far? Very much. Now let’s move on to the most beloved features available to both S100 Plus and L100 Plus.
*Only S100 Plus and L100 Plus.

First Crack Detection
First Crack Detection is one of our most convenient features in both S100 Plus and L100 Plus.
This feature turns ROEST into a fully automated roaster that ensures each coffee reaches its full flavor potential regardless of skill. How is this possible?
The First Crack detector will identify individual cracks and register the First Crack event.
After the event is recorded, the roaster starts counting down the development stage and automatically releases roasted beans.
“One of the reasons I decided to get a ROEST machine was its automatic First Crack Detection function. This is because First Crack decides not only quality but also consistency.”
- Hidenori Izaki, 2014 Barista Champion
Consistency is essential when it comes to roasting the perfect batch. By collecting FC data, you will better understand what’s happening to the coffee and gain better control over the roast and the flavor profile.
For businesses roasting multiple batches per day, it is also an enormous help to save time, reduce workload and save money - all thanks to full automation with high-quality and consistent roasts. You can rely on automated technology to help you perfect your roasts without much attention and interaction.

Air Temperature
The air temperature measures the environment inside the drum and corresponds to the convective heat energy you have available. Changes to this temperature can affect the desired qualities of a roast, so predicting its behavior can help keep the temperature in control and prevent sudden changes.

Live view example with temperature sensors available on S100 Plus. Red graph = bean temperature, blue graph = air temperature, green graph = inlet temperature.
Bean Temperature
The bean temperature sensor is placed in the center of the roasting bean mass. By monitoring this temperature, you can find out what’s happening during your roast, why it’s happening, and when. It can be used to ensure that everything is going according to the plan.
Bean- and air temperature sensors are included in every ROEST model.
Inlet Temperature
An inlet temperature sensor monitors the temperature that comes from the heating element and goes into the roasting chamber. It can significantly improve the roasting compared to power profiles due to higher precision. This type of sensor is, therefore, a good improvement, or in addition, for those who mainly use power profiles when roasting on a ROEST sample roaster.
Inlet temperature sensor is included in ROEST S100 Plus and L100 Plus.

More Data
Christian Castricone, a home roaster based in Switzerland, is the owner of a S100 Sample Roaster. The S100 has been meeting all his needs, yet after owning the roaster for quite a while, he is ready to take it to the next step. “If I were to choose again, I would go for L100 Plus due to the added sensors that allow more data.”.
Basic or Plus model?
The difference between the Basic and Plus models (S100 vs. S100 Plus and vs. L100 Plus) is the added First Crack Detection feature. If you opt for a basic model, you will have to listen and register the First Crack event by using the touch screen. *See the table for all the differences.

Download detailed list of technical specs here.
Differences
Additional Temperature Sensors
The L100 Plus has two additional temperature sensors; drum- and exhaust temperature.
In short, the drum temperature is the internal temperature of the drum when beans are added. This temperature should be adjusted according to the green beans’ density, moisture content, processing method, variety, and batch size. Analyzing the drum temperature can help you achieve the perfect roast, as a higher temperature can scorch the beans, and a lower temperature can result in baked coffee. The drum temperature sensor is needed to get the most out of the Between Batch Protocol feature.
The exhaust temperature measures the heat energy in the airflow exiting the roasting chamber. More specifically, it is the remaining heat energy input in the roasting mass, and collecting this data will help you understand more of what’s happening with the heat transfer.
The live view on L100 Plus shows graphs of the two additional sensors - drum temperature and exhaust temperature.
The extra sensors provided in L100 Plus allow further tracking and data collection when roasting. This makes L100 Plus ideal for professional quality control or scientific research; for example, Hard Beans in Poland uses it for scientific research about green coffee storage, the Research University of Zurich for various research topics, and the COMA project is currently conducting coffee research in Mexico to enhance specialty coffee quality in their market.
Between Batch Protocol
The L100 Plus also has the full version of the BBP feature, which helps you to achieve the most consistent roasts.
Between Batch Protocol is a way to reset the thermal energy in your roaster between batches. By using this profile on your ROEST Sample Roaster, you will have the same starting conditions as you had on your previous batch. When sample roasting, your main goal is to achieve the most consistent result on every batch. Using BBP with your chosen profile makes it more likely to get that.

Cooling Tray Warning
Thanks to the dual fan system in both models, you have the ability to roast back-to-back - meaning there are seconds in between each roast. How does it work? When the roast is finished and drops in the cooling tray, you simply charge a new batch while the previous is cooling down.
Now, this is where the Cooling tray warning comes in handy. This is a sensor that is only included in the L100 Plus model and alerts users to remove beans from the cooling tray. When operating a fully automated roaster, you might find yourself too focused on other important tasks of your job. Therefore, the sensor is beneficial as the machine will remind you to remove the coffee, in order to avoid mixing two batches.

Wood VS. Aluminum
Do you prefer the ultimate Scandinavian look with wood panels or the sleek and seductive black aluminum?
It might be tempting to choose based on the style. However, on L100 Plus you can choose between an aluminum design and heat-resistant PTFE handles, or go for the full Scandinavian style with wooden panels. So in terms of panels, you will need to ask yourself - where will I place the Sample Roaster while roasting? And most importantly, does the wooden/aluminum model include the features I require?
What’s the Verdict?
Both sample roasters provide you with plenty of roasting data: environmental and bean temperature, rate of rise, main motor speed, airflow, power, crack rate, and more. They can both roast automatically or with an advanced manual mode and help you improve roasting skills and coffee quality.
In the end, you’ll have to look at the differences and decide if additional sensors or aluminum panels will be needed for your business. It is crucial to determine what you want from your sample roaster in order to not overspend on features you won’t use or, conversely, miss out on valuable data that could help you.
If you do not intend to use drum temperature, exhaust temperature, or cooling tray warning, then S100 Plus will be enough to satisfy your sample roasting needs. On the other hand, if you’ve been wanting to collect more data and take your roasting to another level, then L100 Plus is a better choice. With extra sensors and more data to collect, L100 Plus has quickly become a preferred sample roaster for coffee professionals and scientific researchers.
-
We hope this article will help you make a final decision. If you’re still in doubt, do not hesitate to reach out to us by filling out a quotation form. We will get back to you with more information about the sample roasters and answer any questions you might have.
Wonder exactly how ROEST can help your business? Then check out these 5 reasons why.
Roasting coffee at home - all you need to know before you start
Are you thinking of roasting coffee at home? Sounds like a delicious idea! You probably have a lot of questions before you buy a roaster. We asked Christian, a home roaster based in Zurich, to share some useful tips and make your start easier.
Are you thinking of roasting coffee at home? Sounds like a delicious idea! You probably have a lot of questions before you buy a roaster. We asked Christian Castricone, a home roaster based in Lausanne, Switzerland, to share some useful tips and make your start easier.
Over to Christian:
Why roast coffee at home?

Christian - looking sharp, right? Enjoying the process of roasting coffee at home with ROEST.
Anyone can be a home roaster
If you are thinking roasting coffee is difficult – maybe you have not tried roasting on the digital roaster yet. It is easier to operate and get consistently good results without much effort. Soon enough you will find yourself roasting your own beans, creating profiles but mostly enjoying that delicious cup of the freshly roasted coffee. You may as well become more popular as your friends will be coming over to taste a cup of your new hobby.
Fresh coffee every day – explore different origins
The main reason I ‘ve started to roast coffee at home is the idea of freshly roasted coffee. I like to drink different coffee every day for each brew. It is also a way to learn more about the coffee and the coffee roasting process – and it’s a lot of fun too! I love high quality coffees, for example the Geisha variety. I like drinking a lot of these types of coffees and I found that investing in a home roaster is a way of saving money in this little hobby of mine. On the other hand, when roasting coffee by myself, I have control over the taste, and I get to try a lot of different coffees.

If coffee is your passion, you will definitely fall in love with roasting coffee at home. The only fresh roasted coffee you can call your own.
Where to buy green beans for home roasting.
Search online
If you are looking for regular specialty coffee, these are usually sold in bags of 30 – 70kg depending on the origin. You can either contact a coffee importer or get in touch with local roasters who are willing to sell you green beans by the kilogram.
There are more and more websites (mostly in Germany and UK) selling green coffee per kg. Some specialty coffee importers, for example Falcon, are starting to sell smaller quantities as well. Looks like the home roaster’s market is showing higher demand, which is opening more opportunities for us to try different lots.

So how about some samples from Nordic Approach! Oh, and they roast on ROEST too!
Directly from the producer
For high quality coffees (mostly exclusive nano lots) it’s a bit easier to buy it directly from the producer – for example Janson and Longboard or Finca Deborah in Panama. The main reason is the size of the box – the higher the price per kilo, the smaller the minimum amount you can purchase. The only downside would be the shipping cost from the origin but at the end it’s worth it if you order no less than 5 kilos.
Christian got in touch with Matt who shared with him the way he roasts with ROEST (read here). Home roasters community meets here, on forum.
The best roaster for your home.
SMALL CAPACITY
Home roasting is a great way to learn more about coffee and the roasting process itself. When I was looking for a great home roaster to begin my journey of learning, my priority was to find a small scale roaster. With the ROEST I can roast small amounts of coffee (50 – 120g) which is a great opportunity for experimenting with different coffees at home.
Powered by electricity
To better learn about the coffee roasting process, I was looking for a home roaster with similar technology to a bigger/ production roaster. ROEST sample roaster is the drum roaster (just like production roasters) with hybrid technology. It means it’s powered by electricity instead of gas to achieve better control and higher consistency. It also allows you to roast from your home as the power consumption is less than your coffee brewer. And it does not require any special ventilation system.
Easy to use
ROEST sample roaster is amazingly easy to use. At the beginning you need a little bit of practice, getting familiar with the roasting process and how to work with all the parameters. Once you understand how this sample roaster works, it’s a real pleasure to roast batch after batch and enjoy the coffee and the process.

CHRISTIAN

LOVES

HOME ROASTING :)

Nordic design turns ROEST roaster into beautiful piece of furniture for your home.
How to set up a roasting space at home.
HOME ROASTER IS A PIECE OF ART
There is no need to be worried about rebuilding your kitchen or setting up a special workshop just so you can roast from home. Digital home roasters are becoming one of the kitchen appliances as they are safe to use from the comfort of your home. ROEST sample roaster is not just a perfect fit for roasting from your apartment, it also has a beautiful design that compliments your furniture.
ALL YOU NEED IS …WINDOW!

Christian’s home roasting corner. He has a 3m ventilation hose to reach the balcony door.
All you need to start roasting at home is a table or small space on your kitchen counter which is near by a window. Next to your roaster you might want to place your notebook or phone for following the roasting curve live on the screen, a small scale for weighing beans or paper for notes.
A window is crucial for the ventilation of the fumes generated during the roast. There is no need to set up a special ventilation system. ROEST roaster comes with a ventilation hose which you easily attach to the roaster and loosely direct outside of an opened window. If you roast a small quantity of samples it is enough to use only a 90-degree elbow for directing the fumes to the side towards the window (you can see how it works here).

Matt Winton roasting coffee at home. Ventilation hose is attached at the back of the roaster and loosely hanging on the window. Safe and simple.
Roasting profile to download
Christian shared with us his favorite roasting profile for ROEST owners. It’s a power profile for Geisha variety, Natural processed coffee. Click and copy to your library.
STARTING TEMP: 200 C
SAMPLE SIZE: 100 g

CHRISTIAN CASTRICONE, HOME ROASTER based in Switzerland
Useful links for home roasters
How to create roasting profiles:
Where to meet and brainstorm with other roasters:
Developing roast profile with Matt Winton
When corona virus hit, I was fortunate enough to have my ROEST machine with me at home, along with a small supply of different green coffee samples. I began to roast and test. I quickly discovered that when using the Power profiles, I could replicate the effects of the Gas coffee roaster very similarly. The first 3 months were such a learning process. I hope that by sharing my journey, you could have a place to start, and test it for yourself.
Written by Matt Winton
When I first heard about this small sized, electric, sample / home roaster, I have to admit; it peaked my interest. Many professionals were talking about it. Mainly about the versatility for manual control in the roasting process.
Being very new to roasting myself, I was very curious.

I continued to learn on a larger, traditional gas roaster, and was figuring out the effects of energy, airflow, time and temperature on this large roaster, and began to understand more. I had heard that similar results could be achieved using ROEST, but was unsure if the same principles from the large roaster would apply.
Locked down with ROEST
When coronavirus hit, I was fortunate enough to have my ROEST machine with me at home, along with a small supply of different green coffee samples. I began to roast and test. I quickly discovered that when using the Power profiles, I could replicate the effects of the Gas coffee roaster very similarly. Applying energy or airflow at different points in the curve brought the expected results. I was so pleased to see that what I had learnt was not just applicable to one (production) roasting machine! The versatility of the ROEST sample roaster at home meant that I could roast 50-100 g of coffee without a problem, in the comfort of my own living room, and then brew these samples for my prospective competition at my leisure.
“ Once I worked out what each function corresponded to in the cup, I found it a lot easier to develop roasts with purpose. ”

Matt enjoyed the cozy atmosphere of home roasting during the lock-down.
understanding the parameters
The functionality and diversity of the parameters in the ROEST meant that I could really dive deep and I had a steep learning curve. Once I worked out what each function corresponded to in the cup, I found it a lot easier to develop roasts with purpose. This first month (April 2020) or so was a journey of learning, discovering how the total roast time affected vibrancy of the coffee, controlled by how the Power affected total roast time, airflow affected power, drop/charge temperature affected roast degree… There were so many variables!
The best thing I did was roast a lot of the same coffee, with slightly changing profiles, adjusting only one variable at a time, and cupping afterwards. This meant that I could see what did what in each roast.

Matt’s Roasting Approach
My approach to roasting is quite simple, I don’t try to do many changes to power or airflow during the roast, and I try to apply as much energy in a shorter amount of time as possible, without overdoing it, in order to create bright flavour, acidity, sweetness, and mouthfeel. This is a very general approach, and is actually coffee specific, but if I could roast a coffee with no changes to settings, I would try that. So, I do only Power Profiles, and manipulate the roast time and temperature with the Power setting.
Early on, I decided to couple the airflow with power, to “mimic” a Loring style of roast, where more energy was applied through hot air (not totally accurate, but for this explanation, close enough). For example, this profile uses 80 % airflow + 80 % power, then after 1 minute 70 % airflow, with 70 % power for the rest of the curve. (From here out I’ll just refer to “Power”, when I mean both Power and Fan.)
Roasting time
Firstly, I played with the overall power setting, and saw how this controlled total roast time particularly. I found that any roasts longer than ~5:30 would tend to be a bit flat, and not very vibrant. I found that roasts shorter than ~4:30 were a bit too acidic, and sharp in general. So, I had a rough guide for how long I wanted my roasts now. I knew I wanted to get as much energy into the beans at the start of the roast, but if my power was too high, the roast would be too short. I developed a profile that had high power for the first minute, then dropped by 10 %. This gave me a profile that lasted for 5 minutes, and I could adapt, whether I needed more or less energy for different coffees, at different points in the roast.

Home roasting in Matt’s living room.
charge temperature
The next step was to figure out what charge/drop temperature to hit. This temperature dictated how quickly my roast picked up (affecting total roast time), and also initial energy application. I found that temperatures too low were resulting in longer roasts (tasted flat) and too high temperatures ended up getting too hot before having proper development. I settled on 210 °C for a 100 g roast, and 190 °C for 50 g roasts, through trial and error. These temperatures were a good balance between getting enough initial energy, and not burning.
DRUM RPM
The drum RPM was an interesting one, it was a totally different variable than I was used to, and as such, I didn’t play too much with it. I tried a few curves with lower, and higher than 55 RPM, and found that they just tasted bad. Perhaps there’s something to changing the RPM throughout the roast, but I haven’t tried it too much. 55 RPM was giving great results, so I stuck with it.
DEVELOPMENT TIME
Generally, I would be doing 30-45 seconds of Development time after first crack for any coffees. I found that more got too hot, and I would get lots of roasty notes, and anything less was a little too light, and perhaps a little green for my taste. This is, of course, only applicable to my roast profile, as I have a certain rate of rise which dictates my DVT.

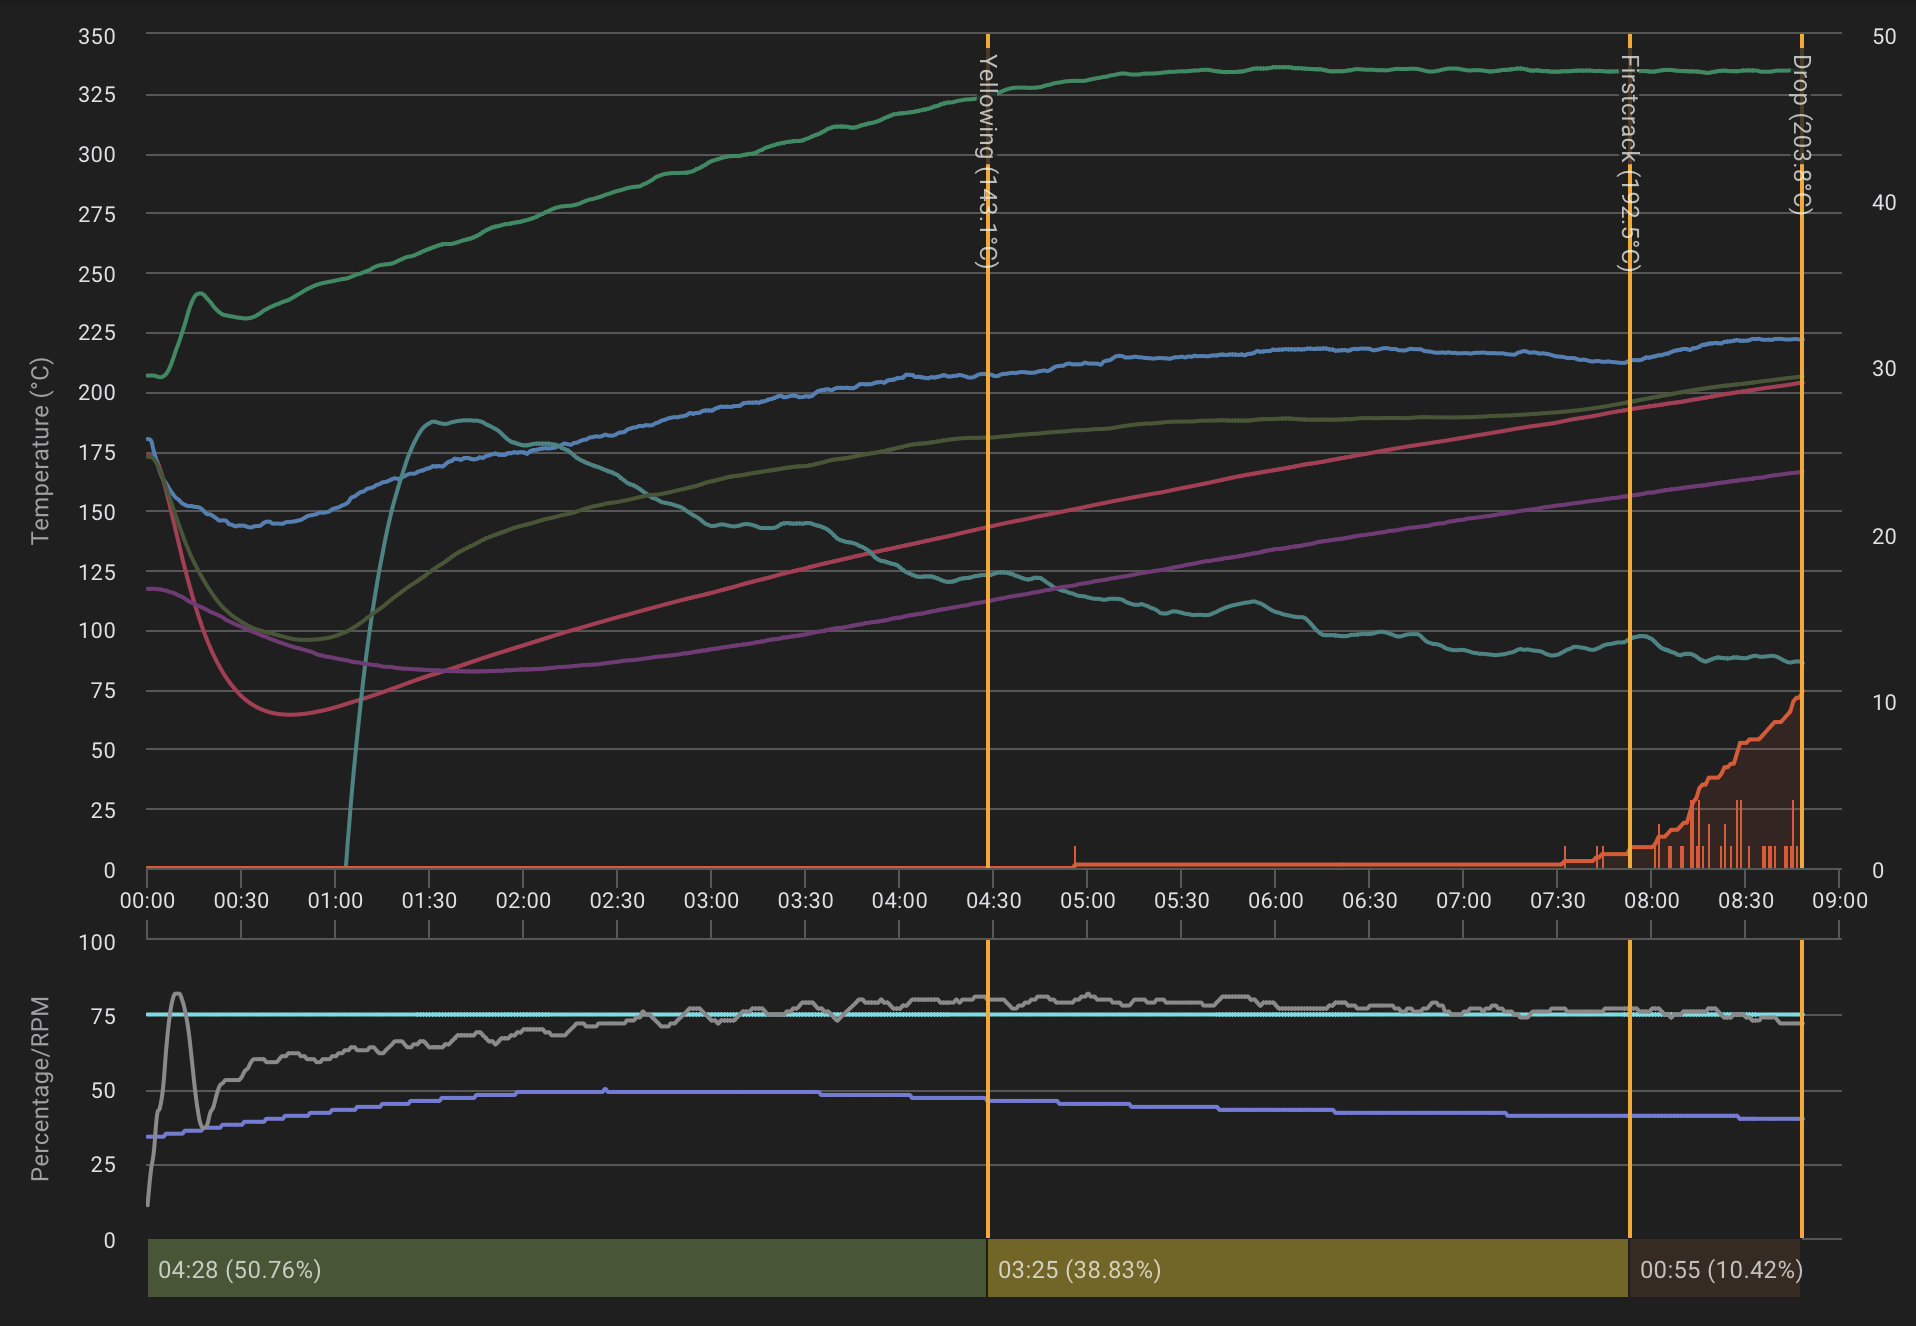
Roasting graph of Matt’s profile. Matt is one of our Beta Users for new User Portal - soon all our ROEST users will be updated with this latest version.
Copy the profile for your ROEST library here (Switch the setting to Power profile and set on your machine the correct charge temperature).
SUMMARY
This is how I came up with the curve I used for all my 100 g roasts. This profile needed to be slightly adapted for different coffees, depending on the varietal (bean size), process (density), and altitude (density again).
For example: I found that a High Altitude Washed Pink Bourbon from Colombia required a boost of energy before first crack, in order to bring out extra vibrancy in this coffee, otherwise the curve after FC would stall. And if I applied that curve with extra energy to a heavily Fermented Natural Pacamara, it would be burnt at first crack, and the curve would run away, and get way too hot.
I discovered that with this total roast time, I had coffees ageing in a similar way to the bigger gas roasters (but slightly faster). The coffees tasted great up to 24 hours after roast, then dropped in intensity, becoming quite shy. They then slowly picked up more flavour and vibrancy, degassing better after 7 days, up to 14 days, then anything after 21 days was starting to lose quite a bit of intensity and sweetness.
Learn more about the parameters on our How to ROEST page here.
…AND THE MAINTENANCE?
Cleaning and setting up this machine is so, so easy! I wipe down the collection tray, empty the chaff collector, and pack up the ventilation hose in less than 5 minutes after cooling down!
The first 3 months were such a learning process, and I am very grateful for having the free time to test the parameters, and come up with a roast profile that I liked. I hope that by sharing my journey, you could have a place to start, and test it for yourself. Perhaps your taste preferences ask for a longer roast time, or a shorter one. It’s up to you to test and adjust and have fun learning!
-- Matt.
Photo credit: Anja Christina
Interested in another tip on how to create 50 g roasting profile? Read more about it in this article.