

Learning to ROEST with Long Miles Coffee Part 2
David Stallings from Long Miles Coffee shares the full and detailed report on developing profile for Long Miles Burundi samples. Interesting explanation of the transformation from Air Temperature profile into Power profile. Profiles for your ROEST are included.
Profile Development
This is a part 2 of the blog Learning to roest by David Stallings from Long Miles Coffee. Read the first part here.

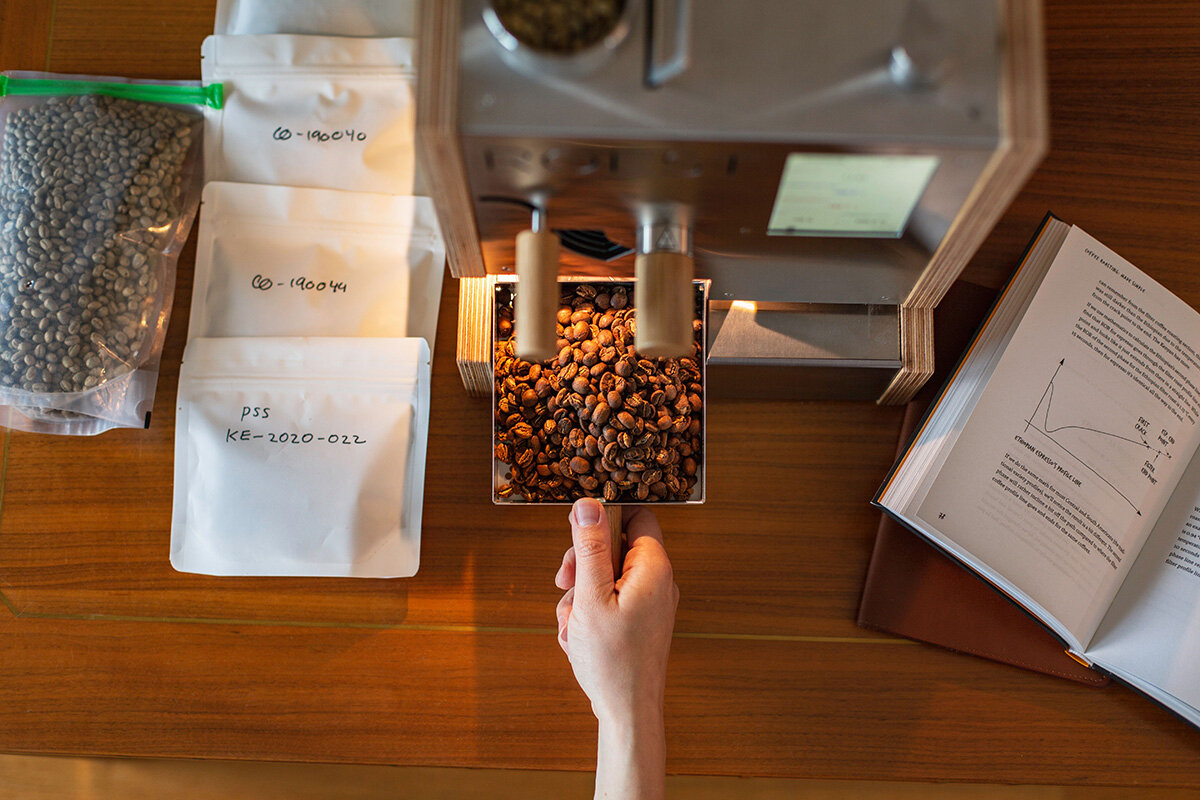
David roasting samples on his ROEST sample roaster.
Over to David:
Though Long Miles is on the cusp of our expansion into Kenya and Uganda, my learning how to use the Roest coincided with the Burundi harvest. As such, I had to find profiles that worked well to highlight the flavors of a Fully Washed Burundi coffee, a Natural Burundi coffee, and a Honey Processed Burundi coffee. I was glad to have this built in limiting the number of coffee types I was looking to dial in. That said, I do not think it changed my process greatly and I believe that after my time dialing in Burundi coffees, I am confident roasting coffee from any origin on the Roest.
understanding the BEAN TEMPERATURE BEHAVIOUR
The profiles I started with were all based on Air Temperature. I noticed immediately that my bean temperature dropped off fairly quickly after first crack compared to profiles I found in the various resources Roest offers to its users.

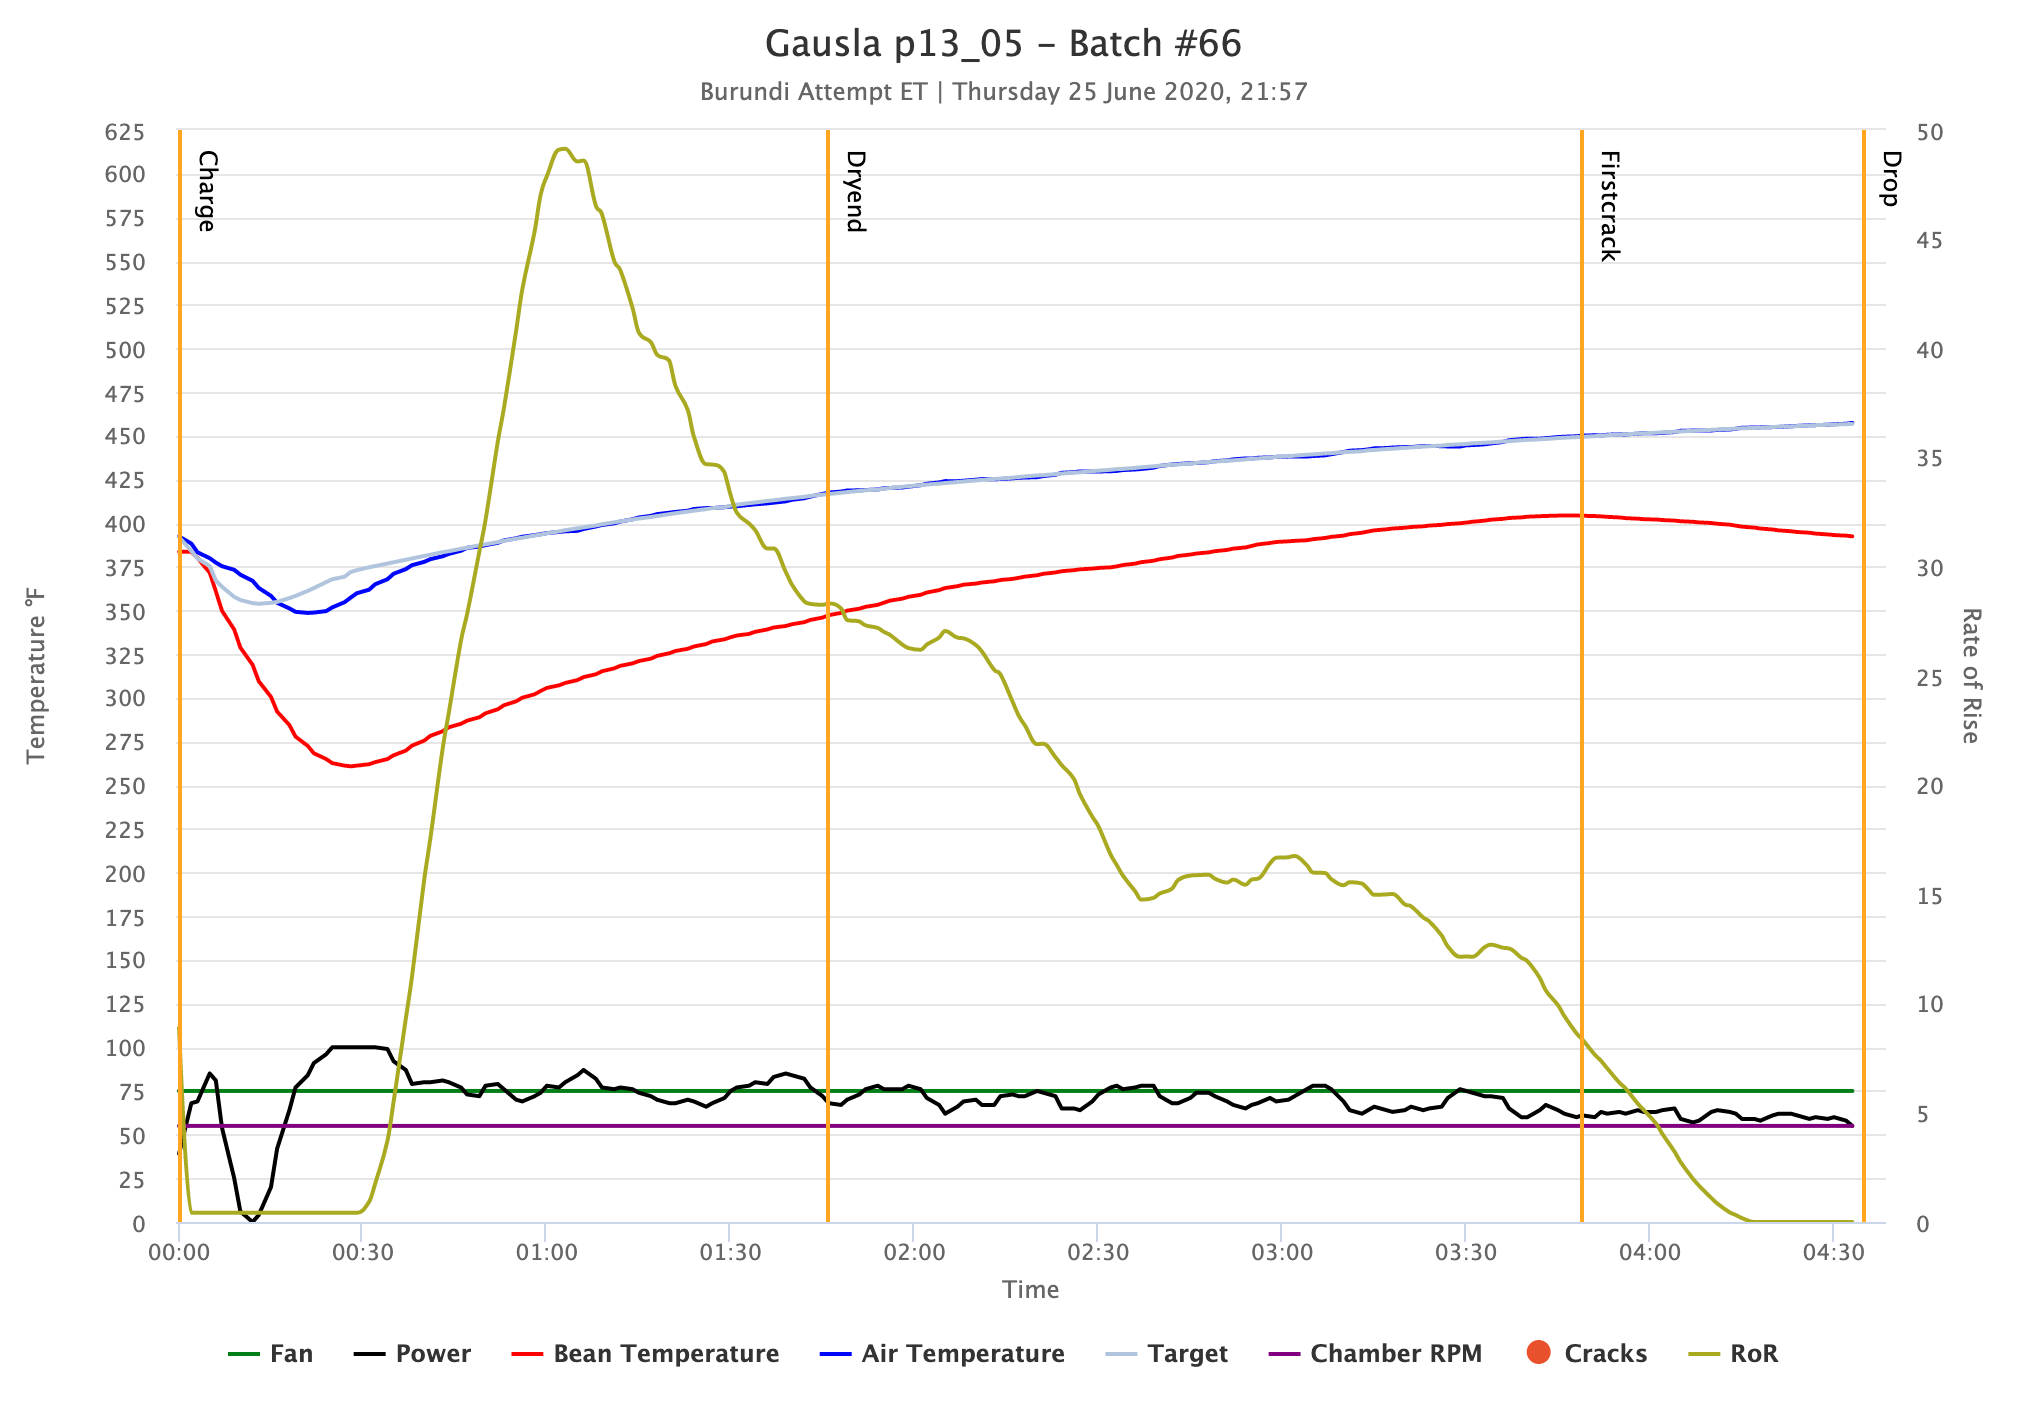
Though this says Batch #46, this was actually one of my first roasts on the Roest (my machine had been used as a demonstration model prior to my owning it).
One of the first things many of us were taught as roasters is to not let the bean probe temperature drop after first crack (or at any point in the roast, for that matter). Over the past six years, in particular, attempting to achieve light to very light roasts that are still fully developed and soluble enough for a home consumer to make on mediocre equipment, I have learned to question this maxim slightly. I have found this to be especially true for small roasting systems (~5kg and under), though I certainly am not limiting it to small systems. I am convinced that many of the machines I have roasted on in the past decade have had bean probes that, whether owing to probe type, placement, age, or a likely combination of all of the above, are only expressing a partial truth. When development times are short (30 seconds to a minute), and if you are roasting on a machine in which you have audible confirmation of first crack (i.e. not a Loring), I would argue that hearing a continued first crack and seeing an increase in the exhaust or ambient temperature probe(s) is confirmation enough that the bean mass is moving through first crack appropriately. Based on this information I was not hugely put off by these initial roasts.
After repeating this roast a number of times, I confirmed that first crack was slightly anemic - it was a bit more of a trickle than a constant, rolling crack. This was further confirmed in the cup which was slightly starchy and underdeveloped - though, not massively so! This gave me confidence that I did not need to see a bean probe reading that continued to increase in temperature from first crack through the end for it to be properly developed. Looking at the profile I did want to see the initial rate of rise get up higher and descend more or less gradually and evenly from there. It has been my experience that getting energy into the coffee mass early in the roast is paramount for a fully developed light roast.
profile adjustments
I made some quite simple (and easy to perform) adjustments to the desired Air Temperature profile. The resulting profile performed nearly exactly how I expected it to:
Minor adjustment: the Air Temperature dropped from 425°F to 350°F.
I now had a much more dramatic peak to my Rate of Rise curve. This was achieved by dropping the Air Temperature profile to only 350°F at the start, as opposed to 425°F. This minor change had profound effects for the entire roast. Not only did it get more energy into my bean mass early on, but it also allowed for a more gradual increase in my Air Temperature profile and a shorter roast time overall. This adjustment allowed the bean mass to take on heat more evenly (as indicated by the more gradual decrease in the Rate of Rise curve). I have found that energy put into the system early in a roast will carry through the entire roast if energy in is properly managed. As such, even though the target Air Temperature profile was more gentle after first crack, the bean mass continued to have more energy through the end of the roast.
Read more about all the adjustment you can make when roasting coffee on ROEST sample roaster.
understanding the Power curve
One final thing worth noting is the Power curve of the profile. When designing profiles based on Air Temperature, the ROEST sample roaster automatically modulates the burner power to hit the target Air Temperature curve. In the first roast the Power line of the graph gradually increases throughout the roast. That is the say, the system needed more energy input throughout the roast (including from first crack to the end) to achieve the desired Air Temperature profile. In the second roast, however, the Power gradually decreases. It is my experience and opinion that power (whether electric or gas), generally speaking, should decrease, not increase, over the course of a properly designed roast profile. As such, this was further confirmation for me that my profile was moving in the correct direction.
The result was a much more consistent audible first crack over the course of the 45 second development time. Further, the cup was fully developed with a noticeable increase in sweetness and clarity of flavor.
IS IT IMPORTANT TO FOLLOW TARGETED PROFILE?
Roughly seven years ago I noticed that, when using data logging software, if I tried to follow a roast profile exactly, the results were only positive if and when burner/power adjustments were in line with the profile I was trying to replicate. For example, if a roast bottomed significantly lower than the target profile (due to something like the green coffee being colder than when the profile was marked as the reference roast), and I responded by increasing the burner/power significantly in order to get the roast curve “back on target” and then dramatically decreased the burner/power as it approached the target profile, the resulting cup was significantly different than the desired goal. If, on the other hand, I kept my burner/power adjustments consistent and ignored the profile, I would have much more consistent results. As such, a roast that bottomed 20°F lower than the reference roast may have a total roast time that was 30 seconds longer. But, assuming I kept development times consistent, the resulting cup was significantly more consistent than if I had tried to slam more heat into the bean mass in order to make the profiles “look the same.”

You can see the burner modulates to keep the Air Temperature consistent with the target
Similarly, looking at the second profile Batch #66, you can see that the burner modulates to keep the Air Temperature consistent with the target. It achieves its goal - impressively so. That said, I cannot help but believe that all the modulation does not necessarily have the most beneficial impact on the coffee’s development.
DESIGNING THE POWER PROFILE
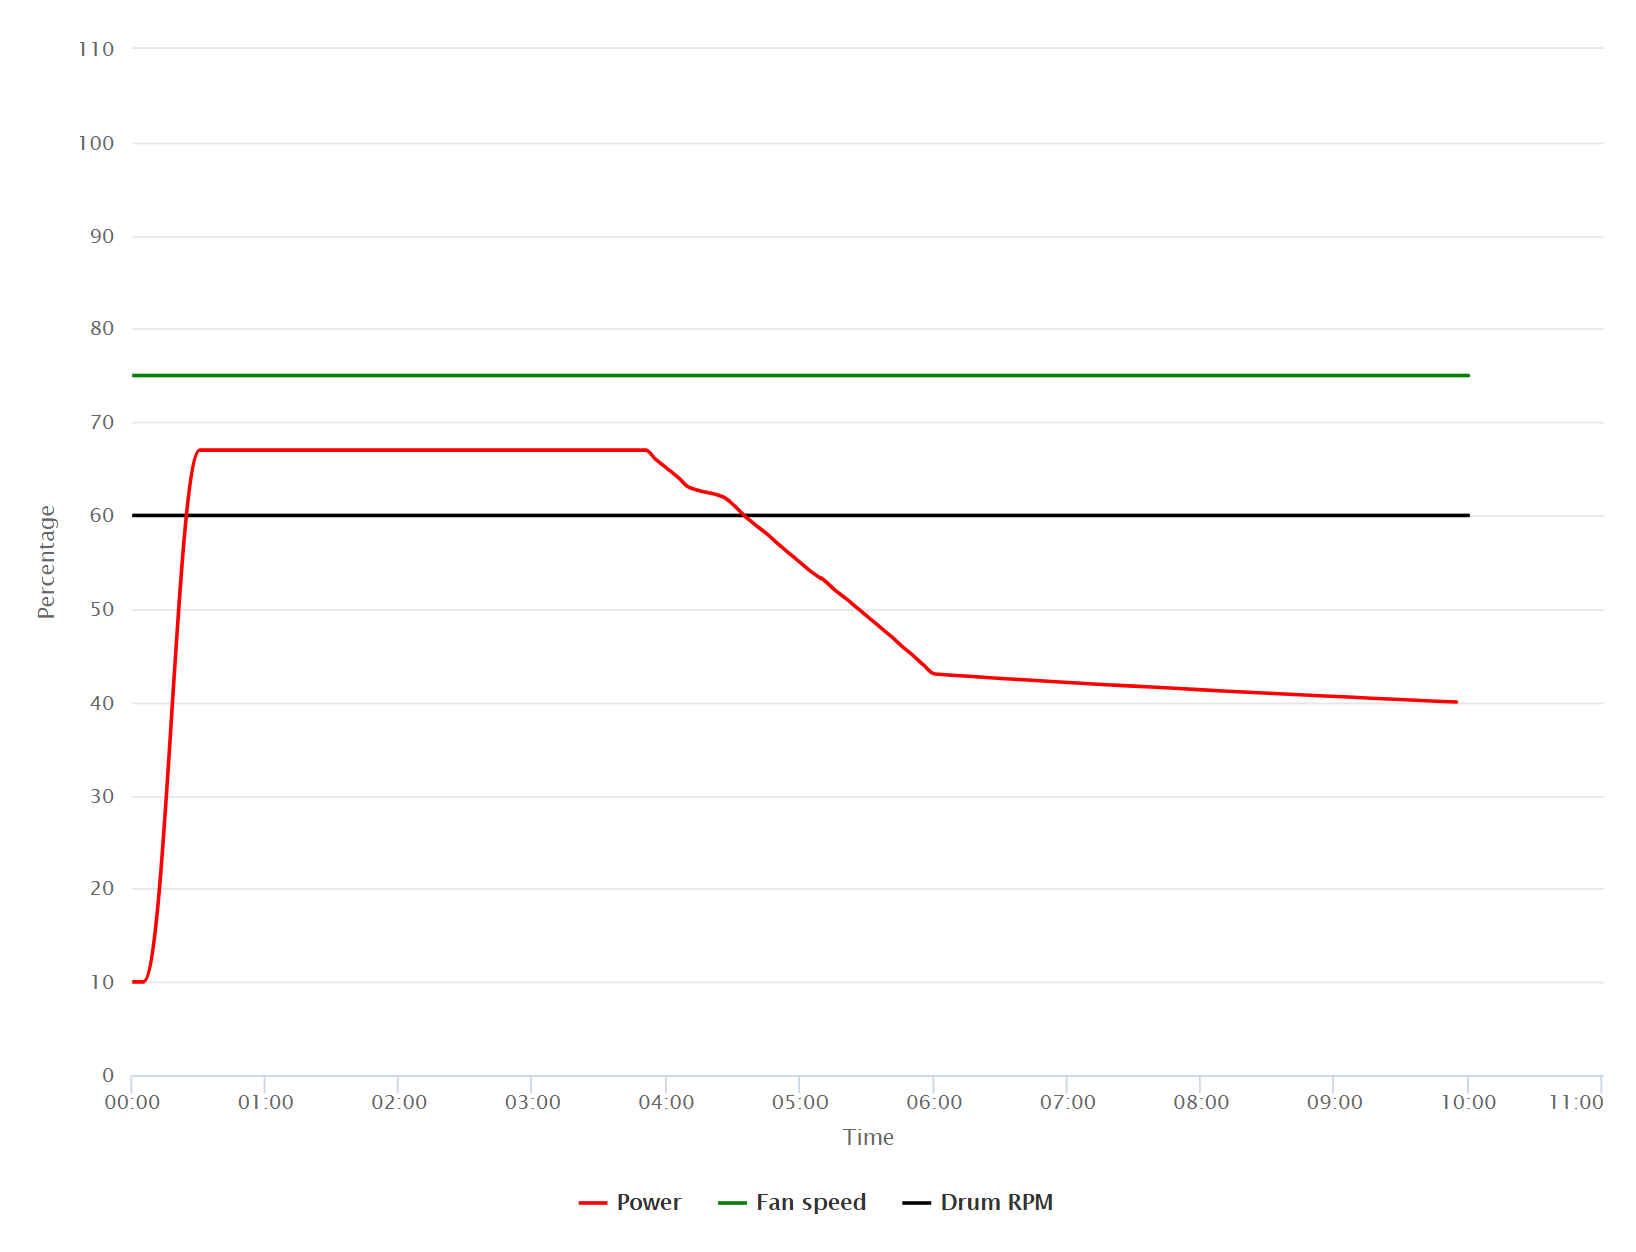
As I referenced above, I have found that consistent gas application, that descends throughout the roast, leads to the most evenly and fully developed light roasts that I have tasted. As such, I looked at the average power that the machine calculated to execute the Air Temperature profile. I then reduced it slightly as my cups were indicating that the roast might be a bit too fast. From there I designed a power profile that descended consistently leading up to first crack and through the end. I am very happy with the results:

Power profile developed for Burundi samples from Long Miles Coffee.
While I am by no stretch of the imagination done exploring developing profiles on the ROEST sample roaster, I have been using two iterations of the same approach to roast all my coffees lately. The only difference between the two profiles is that one ramps up to a very slightly higher power % and does not start backing off until slightly later. I have found that, for sample roasting purposes, most coffees can be divided into one of two categories:
DEVELOPMENT TIME
For my role and purposes, I typically develop each coffee for 0:40-0:50 depending on the coffee. Of course, all of this is painting with broad strokes, but sometimes that is exactly what you need to do in a lab/sample roasting situation. I am not suggesting production roasters take the exact same approach (though, I do believe there is a lot of crossover from this to production roasting).
SHARING PROFILES
It goes without saying that the ability to share profiles is absolutely wonderful. As someone representing a producer and as someone who has, in the past, worked with an importer, the satisfaction that comes from knowing that a client is tasting any given coffee as closely as possible to the way you are tasting that same coffee is absolutely huge. That said, I do think it is critical to remember that a shared profile is a starting place. Every machine is unique, every probe is unique, every environment is unique. Before assuming a profile that you receive is “bad” (especially if it comes from a trusted source), be sure to grasp the approach the creator of the profile was using and adapt it (likely very slightly) for your specific machine.
POWER PROFILE #2 by LONG MILES COFFEE

POWER PROFILE #1 by LONG MILES COFFEE
Roasting whiskey barrel-aged coffee - from sample to sales
Green coffee industry is improving and developing new techniques in order to bring to our customers new flavor experiences. Is your coffee roasting improving along? Roasters are constantly facing new challenges with a trend of experimental approach to processing. Have you ever tried roasting coffee sample that was soaked in whiskey oak barrels?
Green coffee industry is improving and developing new techniques in order to bring to our customers new flavor experiences. Is your coffee roasting improving along? Roasters are constantly facing new challenges with a trend of experimental approach to processing. Have you ever tried roasting coffee sample that was soaked in whiskey oak barrels?
Over to Adam:
Hi my name is Adam and I’d like to tell a story about a recent whiskey barrel-aged coffee project that I led from creation to sales. Vike, my sample roaster ROEST S100, had a special role to play.
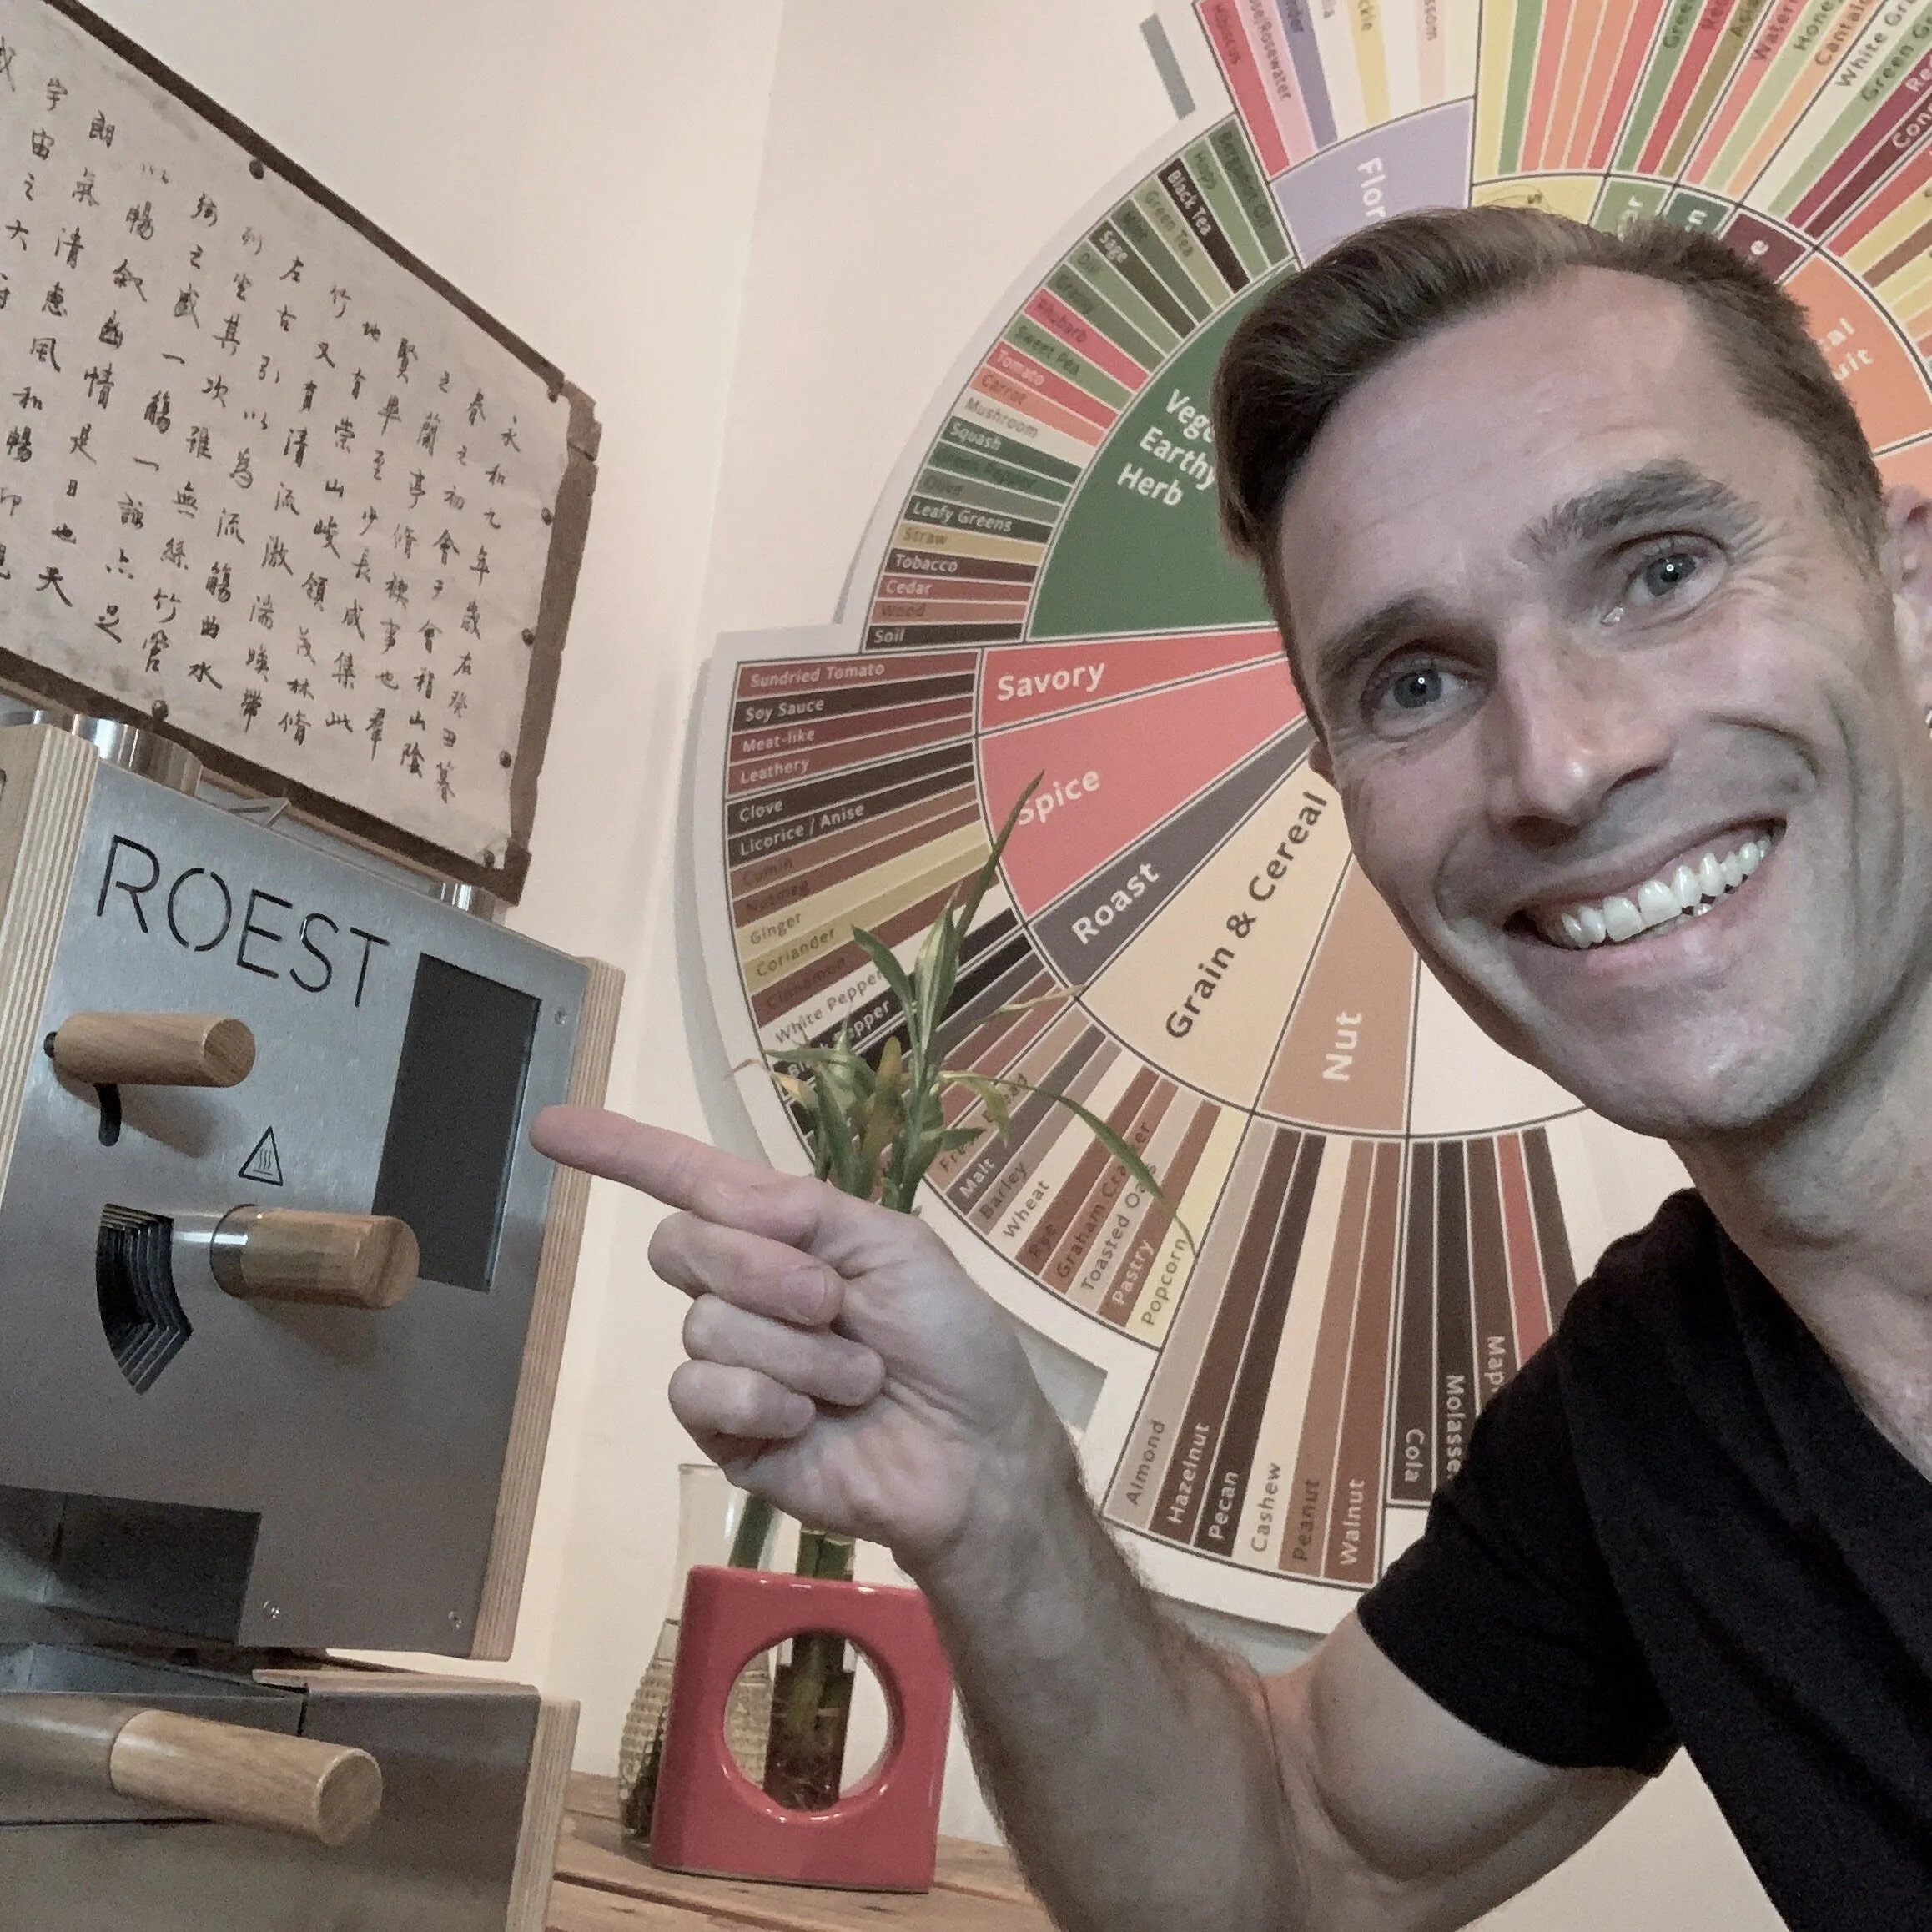
Adam with his ROEST sample roaster named Vike. All ROEST roasters are named after places in Norway.
With high value coffee it’s great to have a reliable sample roaster in order to find the best roast profile and reduce cost of failures. Roasting coffee on sample roaster provides an idea on how to develop the full potential of my coffee. It also gives me an overall understanding of how the coffee reacts to certain roast profiles.
At the end, I provided an exercise for further roast skill discovery and contact info if you have any questions or would like to connect.
“Wow!” coffee strategy

Branch point Oregon wheat whiskey barrels were used for this coffee experiment.
Mid August, I met with a local whiskey distiller to collaborate on a whiskey barrel-aged coffee. Three wheat whiskey barrels were delivered and I committed our Guatemala Monte Cristo coffee for trial. This was going to be a high-value “Wow!” coffee to excite and entice customers sold at USD$20 for an 8oz (227g) bag.
On top of normal sales and marketing duties, I had one month to employ these fresh-hot whiskey barrels to produce an amazing coffee. First I needed to perfect the green coffee ageing, then find an ideal roast profile with ROEST sample roaster, and finally move to roast on a SF-25 (San Fransciscan 25lb) for production and sale.
Soak it until you make it!

Guatemala SHB “Soaking” in Whiskey Barrel
The American Oak barrels showed a 24.5% wood moisture reading while the puddle of whiskey at the bottom smelled of vanilla, honey, clove and caramel. The first test was to take our 10% moisture SHB Guatemalan green coffee and discover how long it should “soak” suspended by mesh bag inside of each barrel to absorb moisture and whiskey aromas.
After successive tests I discovered that it was best to soak the green about 72 hours until it reached 11% moisture content.
Developing roast profile on ROEST
Roasting a high density bean with extra moisture was a challenge. The Standard profile and Nordic profiles both crashed hard and made the coffee flat. I tried more aggressive custom profiles, but they burned the coffee and destroyed all whiskey aromatics.
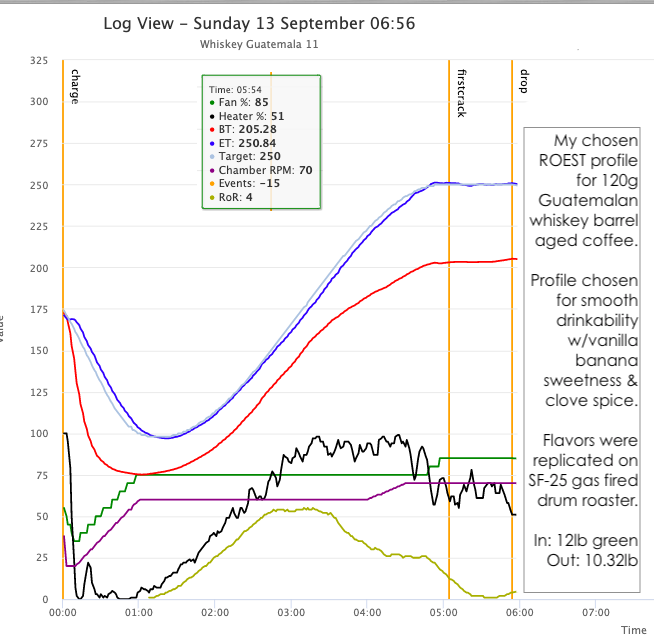
11% Moisture, Dense Whiskey Bean Profile
Finally, on an Air Temperature profile, I chose a low charge temperature at 175°C (350°F) in order to provide a roast soak with a slow turning point. This allowed the internal bean temperature to warm gently and build slow strong momentum to compliment the 11% moisture content.
Increasing the fan and chamber first, I delayed the power increase in order to reach a smooth acceleration. After yellowing I increased the chamber speed (RPM) first to flatten my Rate of rise (ROR) and next increased the fan speed to disperse the ever increasing heat. With a 5:55 roast time I reached 206°C (403°F).
The logic was to use a faster roast to protect the whiskey aromatics. In order to achieve this, I wanted to avoid under development by using the first half of the profile. Second, I needed great power to charge into first crack to avoid losing heat and crashing.
Finally, I anticipated that this process could be replicated on the conductive driven gas fired SF25 drum.
ROEST sample roaster is a hybrid of traditional drum roaster and hot air roaster therefore it is behaving similar to your production drum roaster.
Sweet like a banana with vanilla and clove
The result of the 5:55 Whiskey-11 roasting profile was fantastic. The coffee was clean and crisp, sweet like a banana with vanilla and clove. The team loved it, so it was time to move from sample roasting to production roaster for sale. All this while, I had been promoting online to build anticipation for the unveiling of our whiskey coffee - so customers were ready for fresh batch possible!
Roast profile for you to try!
Here you can copy my roast profile: ROEST sample roaster Whiskey-11
Transferring profile from sample roaster to production roaster
I chose to roast on the SF-25 at 50% capacity - 12lbs green in with a target of 10.32lbs out. The moisture loss of 14% was to replicate what happened on the sample with 120g green in and 103g roast out. This variable needed to remain constant to ensure that a similar process was happening to the beans.
I charged the SF-25 at 350°F (175°C) and let the beans soak nearly 60 seconds before applying 67% gas to ramp up the heat. The damper was 80% open and the fan was at full speed. When I passed yellowing I opened the damper to 100% and slow the ROR slightly with 50% gas.
Roasting on a SF-25 required the 5:55 roast be stretched 1.5x. In order to complete first crack the production roast reached 9:30 at a higher temp of 410°F (210°C) to finish. Moisture loss was 14% and the cupping results were incredibly similar.
The Quality Control team approved and first test customers were amazed. The coffee was sweet, with soft acidity and syrupy body. Whiskey vanilla notes were strong during the brew and aftertaste. The coffee was released and sales quickly exceeded expectations. We sold beans, brews and went big on cold brew for 6 solid weeks of sales.
To sum up

With ROEST sample roaster you can roast both: automatically or manually.
I learned that inverse logic is required to counteract the end of roast crash. A crash at the end, did not imply more heat is needed at the end. This logic destroyed acidity and sweetness. It turned the coffee into a dark boring Guatemala. As you can see on the profile, at 250°C the ET (Air Temperature) holds steady. Another lesson I learned, is that this high moisture high density coffee required a lower charge temperature, deeper dip and soft heat application at the beginning to build internal bean energy and carry the roast up and through first crack.
You need to be able to roast manually small batches: adjust Fan speed, RPM, Power or other parameters in order to direct the roast to the desired cup profile. Sample roasting on ROEST allows me to experiment until I find the best suited profile for my coffee beans.
Your Homework
ROAST DISCOVERY EXERCISE
Start with a reliable roast curve to roast 7 batches of one coffee. Repeat the same profile finishing each batch at: 200°-202°-204°-206°-208°-210°-212°C. Taste how acidity and sweetness peak and where they die off. If you’re lucky, you may find a “dead zone” in certain beans. For example, I have seen that a 206° roast can be wonderful, while the 208° goes flat and then 210° becomes sweet and again. This transition awareness comes from excessive cupping and can lead you to a greater confidence in product creation, promotion and sale.
Share your results with our community on ROEST forum, so that we can all learn together.
Get in touch
If you’d like to connect with questions about barrel-aged coffee or anything else, then please reach out. My new online coffee training, @asc.coffee on Instagram or email me.
Developing roast profile with Matt Winton
When corona virus hit, I was fortunate enough to have my ROEST machine with me at home, along with a small supply of different green coffee samples. I began to roast and test. I quickly discovered that when using the Power profiles, I could replicate the effects of the Gas coffee roaster very similarly. The first 3 months were such a learning process. I hope that by sharing my journey, you could have a place to start, and test it for yourself.
Written by Matt Winton
When I first heard about this small sized, electric, sample / home roaster, I have to admit; it peaked my interest. Many professionals were talking about it. Mainly about the versatility for manual control in the roasting process.
Being very new to roasting myself, I was very curious.

I continued to learn on a larger, traditional gas roaster, and was figuring out the effects of energy, airflow, time and temperature on this large roaster, and began to understand more. I had heard that similar results could be achieved using ROEST, but was unsure if the same principles from the large roaster would apply.
Locked down with ROEST
When coronavirus hit, I was fortunate enough to have my ROEST machine with me at home, along with a small supply of different green coffee samples. I began to roast and test. I quickly discovered that when using the Power profiles, I could replicate the effects of the Gas coffee roaster very similarly. Applying energy or airflow at different points in the curve brought the expected results. I was so pleased to see that what I had learnt was not just applicable to one (production) roasting machine! The versatility of the ROEST sample roaster at home meant that I could roast 50-100 g of coffee without a problem, in the comfort of my own living room, and then brew these samples for my prospective competition at my leisure.
“ Once I worked out what each function corresponded to in the cup, I found it a lot easier to develop roasts with purpose. ”

Matt enjoyed the cozy atmosphere of home roasting during the lock-down.
understanding the parameters
The functionality and diversity of the parameters in the ROEST meant that I could really dive deep and I had a steep learning curve. Once I worked out what each function corresponded to in the cup, I found it a lot easier to develop roasts with purpose. This first month (April 2020) or so was a journey of learning, discovering how the total roast time affected vibrancy of the coffee, controlled by how the Power affected total roast time, airflow affected power, drop/charge temperature affected roast degree… There were so many variables!
The best thing I did was roast a lot of the same coffee, with slightly changing profiles, adjusting only one variable at a time, and cupping afterwards. This meant that I could see what did what in each roast.

Matt’s Roasting Approach
My approach to roasting is quite simple, I don’t try to do many changes to power or airflow during the roast, and I try to apply as much energy in a shorter amount of time as possible, without overdoing it, in order to create bright flavour, acidity, sweetness, and mouthfeel. This is a very general approach, and is actually coffee specific, but if I could roast a coffee with no changes to settings, I would try that. So, I do only Power Profiles, and manipulate the roast time and temperature with the Power setting.
Early on, I decided to couple the airflow with power, to “mimic” a Loring style of roast, where more energy was applied through hot air (not totally accurate, but for this explanation, close enough). For example, this profile uses 80 % airflow + 80 % power, then after 1 minute 70 % airflow, with 70 % power for the rest of the curve. (From here out I’ll just refer to “Power”, when I mean both Power and Fan.)
Roasting time
Firstly, I played with the overall power setting, and saw how this controlled total roast time particularly. I found that any roasts longer than ~5:30 would tend to be a bit flat, and not very vibrant. I found that roasts shorter than ~4:30 were a bit too acidic, and sharp in general. So, I had a rough guide for how long I wanted my roasts now. I knew I wanted to get as much energy into the beans at the start of the roast, but if my power was too high, the roast would be too short. I developed a profile that had high power for the first minute, then dropped by 10 %. This gave me a profile that lasted for 5 minutes, and I could adapt, whether I needed more or less energy for different coffees, at different points in the roast.

Home roasting in Matt’s living room.
charge temperature
The next step was to figure out what charge/drop temperature to hit. This temperature dictated how quickly my roast picked up (affecting total roast time), and also initial energy application. I found that temperatures too low were resulting in longer roasts (tasted flat) and too high temperatures ended up getting too hot before having proper development. I settled on 210 °C for a 100 g roast, and 190 °C for 50 g roasts, through trial and error. These temperatures were a good balance between getting enough initial energy, and not burning.
DRUM RPM
The drum RPM was an interesting one, it was a totally different variable than I was used to, and as such, I didn’t play too much with it. I tried a few curves with lower, and higher than 55 RPM, and found that they just tasted bad. Perhaps there’s something to changing the RPM throughout the roast, but I haven’t tried it too much. 55 RPM was giving great results, so I stuck with it.
DEVELOPMENT TIME
Generally, I would be doing 30-45 seconds of Development time after first crack for any coffees. I found that more got too hot, and I would get lots of roasty notes, and anything less was a little too light, and perhaps a little green for my taste. This is, of course, only applicable to my roast profile, as I have a certain rate of rise which dictates my DVT.

Roasting graph of Matt’s profile. Matt is one of our Beta Users for new User Portal - soon all our ROEST users will be updated with this latest version.
Copy the profile for your ROEST library here (Switch the setting to Power profile and set on your machine the correct charge temperature).
SUMMARY
This is how I came up with the curve I used for all my 100 g roasts. This profile needed to be slightly adapted for different coffees, depending on the varietal (bean size), process (density), and altitude (density again).
For example: I found that a High Altitude Washed Pink Bourbon from Colombia required a boost of energy before first crack, in order to bring out extra vibrancy in this coffee, otherwise the curve after FC would stall. And if I applied that curve with extra energy to a heavily Fermented Natural Pacamara, it would be burnt at first crack, and the curve would run away, and get way too hot.
I discovered that with this total roast time, I had coffees ageing in a similar way to the bigger gas roasters (but slightly faster). The coffees tasted great up to 24 hours after roast, then dropped in intensity, becoming quite shy. They then slowly picked up more flavour and vibrancy, degassing better after 7 days, up to 14 days, then anything after 21 days was starting to lose quite a bit of intensity and sweetness.
Learn more about the parameters on our How to ROEST page here.
…AND THE MAINTENANCE?
Cleaning and setting up this machine is so, so easy! I wipe down the collection tray, empty the chaff collector, and pack up the ventilation hose in less than 5 minutes after cooling down!
The first 3 months were such a learning process, and I am very grateful for having the free time to test the parameters, and come up with a roast profile that I liked. I hope that by sharing my journey, you could have a place to start, and test it for yourself. Perhaps your taste preferences ask for a longer roast time, or a shorter one. It’s up to you to test and adjust and have fun learning!
-- Matt.
Photo credit: Anja Christina
Interested in another tip on how to create 50 g roasting profile? Read more about it in this article.